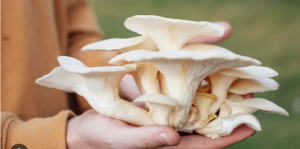

A home-grown food makes an individual feel fulfilled and accomplished. Out of all the edible mushrooms, oyster mushrooms are favored due to their speed of growth, superior flavor, and ease of cultivation.
Even if you have no room in your yard, or no yard at all, you can become able to cultivate oyster mushrooms and receive fresh yields on a perpetual basis. We make it as easy as possible with clear-English directions that anyone can understand.
You do not require much space or machinery, you just need basic materials, time, and loving care. Within a couple of weeks, you will see your mushrooms sprout out, mature, and produce more, providing you with a renewable supply of home-cultivated, organic food.
Why Grow Oyster Mushrooms at Home?
It has several advantages to cultivate oyster mushrooms at home:
- Freshness: Have mushrooms as fresh as can be.
- Cost-effective: Save money compared to purchasing store-bought mushrooms.
- Healthy eating: Choose what goes into your mushrooms, without pesticides and chemicals.
- Educational: A fun activity that learns about fungi and sustainable living.
- Sustainability: Minimize food waste by recycling kitchen scraps such as coffee grounds and straw.
- Flavor: Add flavor to your meals with distinctive, earthy flavors from homegrown mushrooms.
With all those benefits, no wonder more people are looking at mushroom growing. Now, let’s begin at the beginning.
Step 1: Get Your Stuff Together
To begin your mushroom garden, you will need little in the way of equipment:
- Mushroom Spawn: Consider this as the “seed” of the mushroom. Buy it on the internet or directly from farmers who live around you. opt for oyster mushroom spawn either in grain or sawdust.
- Growing Container: Plastic box, bucket, or huge jar. Offer good air supply.
- Growing Medium (Substrate): Coffee grounds, cardboard, straw, or sawdust. These are the source of food for your mushrooms.
- Tools: Gloves, spray bottle of water for misting, clean work area, and sharp knife or scissors.
- Other Materials Needed: Plastic cover or breathable plastic wrap, ventilation holes or air vents.
Tip: Get all as clean as possible. Sterility keeps everything from getting infected and makes sure your mushrooms become healthy and powerful.
Step 2: Set up the growing medium
Your substrate nourishes your oyster mushrooms. Proper setup is important:
- Chop substrate: Cut straw into pieces, 2-3 inches in length.
- Well soak: Soak chopped straw in water for about an hour. This waters the material down.
- Drain excess: Substrate must be damp but not soggy. Too much water with result in mold otherwise.
- Sterilize: Steam or boil the substrate for approximately 30 minutes. This eliminates unwanted bacteria and molds that could prevent your mushrooms from developing.
- Cool down: Let the substrate cool entirely before inoculation.
Why it matters: Properly prepared substrate provides a perfect environment for mushroom mycelium to colonize and develop.
Step 3: Inoculate the Substrate (Add the Spawn)
This is the thrilling part where your mushroom spores start their journey:
- Mix evenly: Spray mushroom spawn evenly over cooled, moist substrate. Mix slowly to evenly distribute.
- Layering: For more abundant results, layer substrate and spawn in your container.
- Seal and vent: Wrap vessel with plastic wrap, lid, or cloth. Push in small air-exchange holes.
- Dark environment: Store your vessel in a dark, warm location, 20-24°C. Darkness promotes mycelium growth.
- Patience: The mycelium will be 2-3 weeks colonizing the substrate fully. Refrain from opening the container frequently.
Tip: Have a clean environment and check for mold or bugs. Healthy mycelium is white and fluffy.
Step 4: Give Optimal Growing Conditions
After the mycelium has colonized the substrate fully, it’s now time to trigger mushroom growth:
- Temperature: Maintain between 15°C and 20°C.
- Humidity: Daily mist the substrate with water to keep humidity at high levels, approximately 85-95%. Soft mist in a spray bottle.
- Light: Although mycelium likes dark, mushrooms will thrive with indirect light. Put your setup before a filtered light window.
- Airflow: Provide air ventilation so that mold cannot form. Have small holes or vents to ensure fresh air flows.
- Moisture: Frequently mist as desired. The setting is damp and not wet.
Pro Tip: Ongoing care in this phase creates bigger, better mushrooms.
Step 5: Pick Your Mushrooms
Around 3 to 4 weeks, your oyster mushrooms are done:
- Check when they are ripe: The caps will be fully open, flat, and ever so slightly curved on the edges. They should be firm and never brown.
- Harvest with a sharp knife: Cut mushrooms at the base of the stem. Avoid pulling, as this can harm the mycelium.
- A few flushes: After the initial harvest, still maintain care over the substrate. Additional mushrooms will develop in subsequent waves.
- Enjoy immediately: Cook your recently harvested mushrooms for use in salads, stir-fries, soups, or your favorite dish.
Tip: Pick at optimal times for ultimate flavor and texture.
Step 6: Care and Reuse
Your first harvest is not the end of the mushroom-growing experience:
- Continue to mist: Continue providing high humidity for future crops.
- Re-inoculate: Re-inoculate the spent substrate with new spawn if you wish to maintain your yields.
- Recycle: Compost or recycle the spent substrate for gardening.
- Clean your setup: Daily cleaning will prevent pests and diseases.
Extra: As you gain experience, try other substrates or other mushroom species for variety and enjoyment.
Conclusion
Cultivated indoors, oyster mushrooms are a rewarding project that involves science, patience, and amazing reward. With just a few easy steps you have a constant supply of fresh, organic mushrooms at your disposal. Purchase these mushrooms from a highly reputable wholesale oyster mushroom distributor at affordable rates.
It’s an entertaining activity that you can learn to educate you on nature, sustainability, and balanced eating. And aside from those, the enjoyment of reaping your own crops makes every bit of effort rewarding. Begin now, grow your mushroom garden, and let it flourish! For quality mushroom spawn and expert advice, come over to Ecanog Farm and start your mushroom growing experience confidently.